Friday, December 29, 2006

Because It Wouldn't Fit In The Chimney

It was left on my front porch. Actually, my chimney's so small that hardly anything fits in it, including liners required by code.

Here's what Santa left for me, a French door to be install. Batteries not included.

The plan is to install it over the weekend where I can get a buddy or two to help. It supposed to be dry (yes, Portland gets dry days from time to time), but it might be windy which in my opinion is the worst weather to work in. Out in the entrance of the gorge, about 10 miles from my house, they were calling for 50 mph winds.

Sunday, December 17, 2006

Oak Tree Tile Trim, Part Three

After feeling somewhat successful at the trial trim creations, I decided that production for the trim around the oak tree tile mural was to commence. Here's the first step - smooshing the clay into the jig section. I lined the bottom of it with part of a plastic garbage bag, as wet clay tends to adhere pretty solidly to the wood jig:


Then I smoothed the surface out, ready to be tooled:


Next picture is running the tool over the clay. I had to do this several times to take small layers off each pass. Tonight was a good learning experience in this little craft, in that you can't take too much off in one pass because the clay will "tear" off. I also found out that keeping it fairly wet decrease the chance of reapplication of clay. If it does tear or if I found a blemish, I would just reapply the clay and start over. But that's no fun. I really dislike rework.


The finished product:


Tonight I was able to make about 90" of the trim in a matter of about an hour and a half. Here are the 4 sections place on the floor to dry out. I placed them against the wood studs to keep the straightness. But wouldn't it be funny if one of the studs was bowed? Hysterical.

Saturday, December 16, 2006

Oak Tree Tile Trim, Part Two

This is part two of my exploration of making trim for my oak tree mural. I apologize on part one for the huge spaces between the pictures. There are some wierd issues with blogger (or I don't know what I'm doing) but there's only so much time in the day. I can't be using it to mess around with blogger.

After making the tool that will form the trim's profile, I made a jig that will hold the clay in place, as well as form the back corner:

And a picture of the forming tool IN the jig (this should clear up any fog):


The first trial run:


After running the tool over the clay several times, adding water, adding more clay, etc, this is what it looks like:


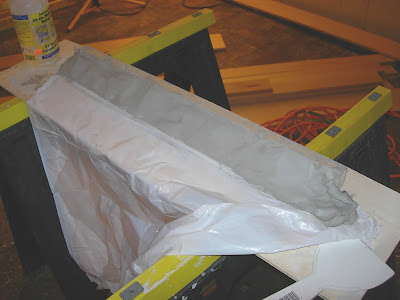
After letting it dry out a few days, it is firm enough to handle but still slightly wet that modifications can still be easily made. This is same piece on my counter. This practice piece is fairly rough and the final pieces should turn out much smoother as I will put more time into it.


But it works!


Friday, December 15, 2006

Oak Tree Tile Trim, Part One

I hope I don't jinx myself but I'm going to capture a step by step process on how I'm going to make my trim around the oak tree tile mural. It's just that I've never done this before so going public with this prior to completion makes me a little nervous. You know, in case I screw it up or something.

So this is where the situation begins. I made an oak tree tile mural over a time period of 4 months, starting October 2005. It is the protective backing to the wood stove. I have the mural up but I need to place trim around it, and I want it to blend in with the cap for the wainscoting:


This is measuring out the cap (sample piece) to see how far it sticks out. This cap will go around the perimeter of the room, sort of like a tall chair rail. I need to make the trim to the mural match this so it will blend in:


Here are some sketches I made, copying a similar pattern to the cap of the wainscoting:


And transcribing the sketch to 1/2" plywood to make a cutting form:


And the final form sketched out to be cut:


The rough cut, done by a $20 jig saw with a metal cutting blade:


After seeing the rough cut, it looked like a disaster and I thought I'd have to start over but after sanding, I was happy with. This is the tool I'll use to make my clay trim to be installed:


Stay tuned for part two!:

Tuesday, December 12, 2006

A Different View

This weekend I offered to hang my neighbor's Christmas lights for her (actually, really for her 5 year granddaughter). But it was really just a ploy to get on her roof to see a different view of my house.

So here's another little house tour, from the roof of my neighbor:


And a view of the backyard (the waterfall is just to the left of the birch):


Friday, December 08, 2006

Drywall Finishing

This past Wednesday, I had the finishers for the drywall start their work. So far, it looks pretty good. They weren't able to meet the walls to the ceiling because of ceiling being not being neat enough to blend in. Besides, I'll probably end up using a crown moulding of some sort anyway. From what I understand, another coat is due, along with some sanding. Just one step closer...

Thursday, December 07, 2006

Mt. Popcorn


That is my ceiling, on the floor.

On Tuesday evening, in preparation for the drywall finish team, I scraped off the popcorn ceiling in the dining room. This was so they could blend the walls in with the ceiling. Also, since I will be installing a tin ceiling, I needed to make a smooth surface to attach the tin panels.

First, I sprayed the ceiling liberally with water, then took a tape knife and just scraped away. It came off fairly easy. The toughest part was cleaning the entire mess.

And the final outcome, not much to look at.....yet.

Wednesday, December 06, 2006

One Thousand Six Hundred and Fifty Lights*

* With the exception of the short section on the small gable that is not lighting up for whatever reason.


That's what I did all weekend. In the cold east wind. Slightly hungover from the irish session the night before. Wearing no gloves.


This is the first Christmas season to hang icicle lights from the gables. I have always wanted to, especially after getting the attic remodel completed. I think a farmhouse looks particularly good with the icicle lights. Unfortunately, I ran out so I wasn't able to get the north gable (or balcony) section completed. Later I was able to find some more lights, though cheaper, I think they'll do the trick. Now, I just have to find the time and the energy - preferably at the same moment.