Remodeling a quaint little farmhouse in Oregon, and getting loads of splinters along the way.
Wednesday, May 31, 2017
Framing the Walls
I like framing. It's not extremely challenging just as long as you have measured everything correctly. The outcome creates a bit of excitement as you can start to see the shape of the building take place. I was able to get the walls framed in about 16 hours and it went pretty smooth.
I
Friday, May 19, 2017
Concrete Pad Pour
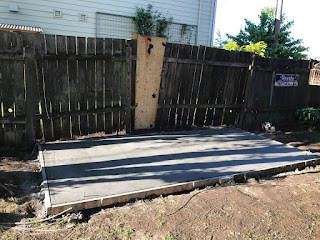
When I first decided on the floor being concrete, I figured I'd just do it by bags and a mixer. But after a few folks comments on getting it delivered, I looked into that. It turns out, after all expenses of mixer rental, bag delivery, the cost was only about $14 less to do it all by hand. Naturally, I went with the concrete mini mix delivery to save my back.
I was able to get it scheduled just before having to take some time off to entertain out of towners so the timing was perfect. It literally only took 10 minutes to get it poured and fortunately my neighbor happened to being around and helped me scree it, and even did the first smooth float.
I was able to get it scheduled just before having to take some time off to entertain out of towners so the timing was perfect. It literally only took 10 minutes to get it poured and fortunately my neighbor happened to being around and helped me scree it, and even did the first smooth float.
Wednesday, May 17, 2017
Concrete Pad Prep
For the potting shed floor, I decided on concrete from my experience of stepping through the floor of the shed that existed on the house when I bought it. I also liked the idea of being able to sweep and clean it easy.
I first had to dig out the space for the slab and a good 6" below it. With the birch tree right next to it, it delayed progress as I had to cut through a lot of big roots. I'm hoping I don't loose the tree actually. The next challenge was getting around all my "utilities" that multiplied through the years- sprinkler system, landscape light lines, drip irrigation and the electrical wiring for the outlet of the previous water fall.
I first had to dig out the space for the slab and a good 6" below it. With the birch tree right next to it, it delayed progress as I had to cut through a lot of big roots. I'm hoping I don't loose the tree actually. The next challenge was getting around all my "utilities" that multiplied through the years- sprinkler system, landscape light lines, drip irrigation and the electrical wiring for the outlet of the previous water fall.
Monday, May 15, 2017
Deconstruction of the Old Shed
Saturday, May 13, 2017
Potting Shed Design
The blog is back. After nearly a 4 year break, I've taken on another project on the 1900 Farmhouse worth blogging about- a potting shed. Though the idea of building a potting shed has been in the works for a few years, I'm finally going for it.
First step is the style of shed that I wanted. There are a ton of great ideas on the web but I landed on just matching the design of the house. Dormer and all.
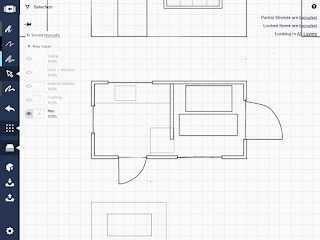
Next step is laying it out on paper. Below are some captures of the design using an app on my iPad called Concepts. It took awhile to get the hang of the app and many frustrating moments of: "why don't I just do this on paper", but after a good few hours, it all clicked.


I also created a framing diagram to get a better feel for how much lumber I'd need as well as work out details and questions before cutting the 2x4s.


The plan view shows there will be two sections of the potting shed- one for storage of lawn equipment and another for a work area.
Subscribe to:
Comments (Atom)


