Pages

Friday, December 31, 2010

Wires, Wires, Wires!

After running the wires in the lower bathroom, I knew I was in for a massive project with the kitchen due to the amount of dedicated circuits and lighting needs. In my Gantt Chart, I blocked away 10 days, gave myself 16 hours and estimated about $125 in materials. So far, (and I'm still not done) I have taken about 30 hours and spent about $260.

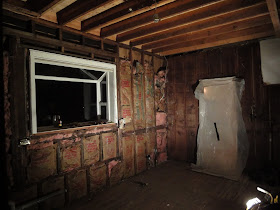
Though the pictures might not show much to you, seeing all the yellow wiring (I used 12 GA for everything regardless of 15A or 20A) really brought the new kitchen closer to reality. I'm having a qualified electrician come check my work prior to covering the walls with drywall. I'll probably do a second check once everything is connected, just to be safe.


Here's a shot of the ceiling boxes. I'm going to have 3 levels of lighting - low nightlight type lighting in cabinets, medium overhead lighting with fixtures from Rejuvenation, and high level task lighting over the counters by means of modern rail lighting hung from old hand hewn rustic beams.


Wiring in the breakfast nook/cove/snug. I'm going to have the outlet halves controlled by switch, so I can have lamps also provide lighting.


The wall boxes for a couple of Rejuvenation sconces


One 3-way switch for the pantry lighting:


The wires on the left are for the low level lighting rope lights that will go at the base of the copper hood. In the middle is wiring for the exhaust liner and the wiring on the right is for the low level and high level light switches:


Wednesday, December 15, 2010

Header and Posts

The theme of the new kitchen is angled more towards a "french country" style so lots of rustic materials will be implemented. The rustic design concepts started with a brick inlay floor with reclaimed full 2x4s, then faux timber beams were added. After the breakfast nook idea was born, there was a need for support of the joists above. It was back to Aurora Mills to find some big beefy timber.

Here are the posts getting sprayed with bleach water to kill the moss that grew on the timbers as they were stored outside:


After speaking with a structural engineer, he guided me to use 4x4s underneath the posts with a concrete block to spread the load since I don't have reinforced concrete in the basement floor. Try not to look at my messy basement, please:


I lucked out with the post location. Check out this tight fit next to the gas line:


I'm no woodworker (as you can see by the direction the chisel is aimed) but I wanted a keyed type fit for the header to sit on the posts. It might be called a "simple mortise & tenon"? Here I am notching out the header:


After nixing the idea of using human strength to support the header while the posts were installed below due to the chance of the header getting away and falling, I rented a drywall jack from my neighbors across the street. Good folks, they are.


The final result. Header and Posts.
It's not that impressive at this point because of all the other lumber around but once the drywall is installed, it will stand out more. I think the contrast from rough and old to clean + crisp makes a killer look


Saturday, December 11, 2010

Kitchen Framing

When I did the bathroom framing back a month or so ago, I did a little framing of the kitchen prematurely. After some plumbing changes and updates, I need to reframe. Here' s a few shots of my make shift plumb bob telling me where to correctly put my plates.


The following picture doesn't give justice to the time spent on this little section. I think it was about 3 hours just in locating, relocating, and notching out for this area.


The finished framing job...
The door on the end is the bathroom entrance, and the wider opening is for the fridge which I'm considering installing early.


Here is the wall between the recently shrunken bedroom and the breakfast nook...


Wednesday, December 01, 2010

Alternate Kitchen Set Up

With the kitchen gutted to the 2x4s, the need for an alternate kitchen and placement of the fridge and microwave and cabinets arose.

What was my dining room, has now become my kitchen...


After two solid days of cooking, the freezer is now stocked with 30 meals. Frozen Famous Barr Onion Soup, Frozen Lasagne, Frozen Stew, Frozen Chili, Pulled Pork, Frozen Ham & Bean Soup, and Frozen Chicken Noodle. I can guarantee that the first meal cooked in the new kitchen with NOT be soup.


What was the newly, somewhat remodeled lower bathroom, is now the dishwasher space...

Saturday, November 27, 2010

Kitchen Demolition

A bit of a delay in posts I realize, but I'm back on it now. Something about demolitioning a kitchen doesn't leave a lot of time and energy to create posts on my delicate computer.

So here's the start of it...


Gary with the circular saw to the......counterTOP????


And the final outcome...


Thursday, November 18, 2010

Magazine Rack

When I did the attic remodel back in 2003, a little light bulb in my head went off to add a built in magazine rack next to the toilet. With the advent of great smartphones, I tend to not read magazines during those deeds anymore, but I still thought it would add some character for the downstairs bathroom remodel.

Rough opening between two wall studs...


With the 1x3's cut for the casing...


Using my kitchen countertop on it's last days as a nearby workbench...


Assembled and held in place by gravity...


This was all done by less than par drill bits so it has got its share of flaws but I think it turned out just fine. It will be painted white along with the trim and beadboard wainscoting.

Tuesday, November 16, 2010

The Copper Hood Is Here


I didn't want to give any sneak peaks to the kitchen remodel but I was so psyched to see the copper hood, that I had to share.

This was made by Vlad at Art of Rain. I highly recommend him. He's personable, friendly, quick, very talented, and with reasonable cost. All the things that make a great experience when it comes to purchasing these types of items.

I didn't really need the hood this soon, but I sure like having it around so I can gaze at it.


Monday, November 15, 2010

Bathroom Door Install

The bathroom floor was fairly easy to install. Now it came time for something more challenging - hanging the old $75 five panel bathroom door purchased from the salvage section at Rejuvenation. I've done this about 3 times before, none of them have been absolutely perfect, but good enough to be workable and to fool those who know not what to look for.

Things were going fine as I took my time on an evening after work, then all of a sudden 3 issues arose:

1. I cut the incorrect end of the jamb.
2. The floor sloped so bad that it created a half inch inch gap at one end of the door's side.
3. The rough in of the framing was too tight and gave no play for adjustment.

As panic sort of almost set in, I broke for dinner and had a solution after my first bite. I just needed to trim off about 1/4" of the jamb. This turned out perfect since I was able to lower the door about 1/4", meet halfway for the slope of a 1/4". The jamb end, that had a funny angle, could simply be caulked to hide my oversight of cutting the incorrect end. My door, which I had custom cut, still had plenty of room to fit within. The task continued to churn forward.

That first evening took 5 hours and I was up until midnight, but the successful ending made it all the worth it.
There is nothing easy about hanging a door, I've concluded. Even attaching the strike and knob hardware needs to be thought through carefully. It sure is fun opening and closing it now though only for the simple fact of.... because it works!


Saturday, November 13, 2010

Getting Heat to the Bathroom


If there is one thing about HVAC (heating, ventilation, air conditioning) work that I have learned, it's ALWAYS wear gloves. I'll never forget the first HVAC project that I worked on at my house (adding heat to the upstairs) and the next day, when I went to work, my hands were riddled with band-aids, much to the amusement of my co-workers. I eventually spilled some blood on this project, since there were some moments that I needed the fingertips.

When I put the bathroom floor in, I spaced and forgot to locate the heat register. That meant I had to rip up some tile and cut through the cement board. That cement board eats sawzall blades like bar pretzels, so you know!


I had some custom boxes made to fit the old registers I bought at Rejuvenation. Once those were installed, and taped up, running the hard and flex duct was a piece of cake.

Here's a shot of the register install...


A before and after view from below...